
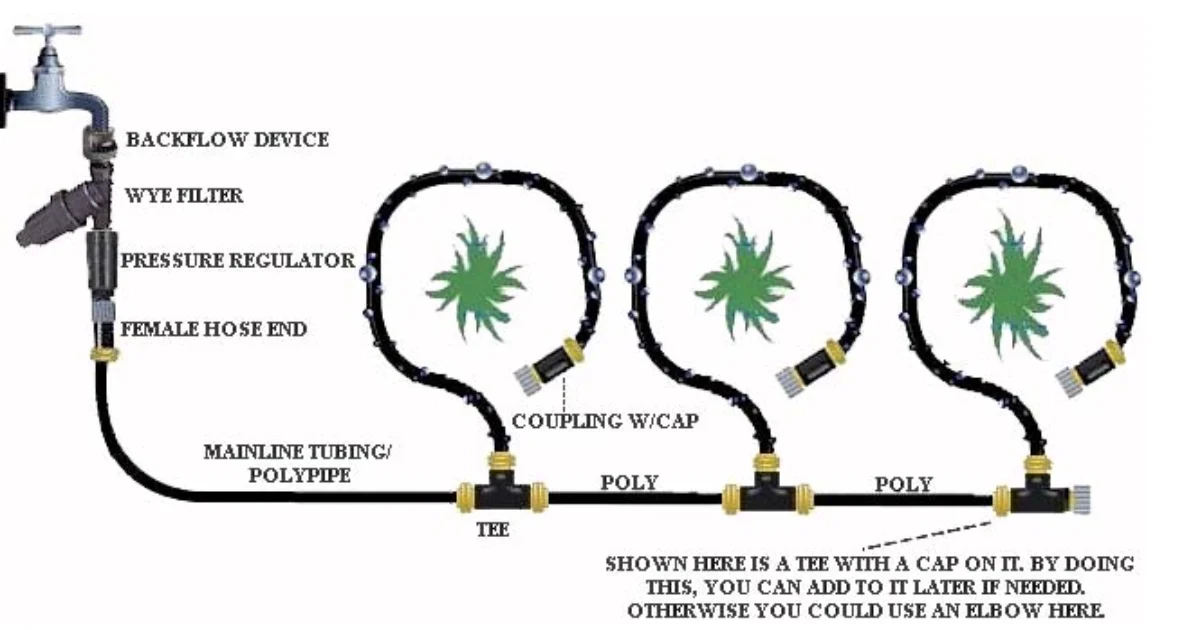
A soaker hose irrigation system offers water directly to plant roots. Along with reducing waste, it improves the plant health. Poor installation can lead to uneven watering, wasted time, and higher costs. That’s why having it professionally installed ensures correct layout, proper pressure control, and long-lasting performance.
To install, start by mapping your watering zones and preparing the water source with a backflow preventer, filter, and pressure regulator. Lay the soaker hoses along plant bases, secure them with staples, and test for even flow. Finally, cover with mulch to protect the system and improve efficiency.
At Wise Water Works, we’ve spent over 30 years perfecting irrigation systems across Houston, TX. From precise planning to expert setup, we handle every detail so your garden thrives season after season.
How To Set Up a Soaker Hose System: 7 Steps to Follow
Installing a soaker hose system can be a long process, but with this checklist, you can move step-by-step without missing anything important.
- Plan the layout – Map zones, measure distances, and mark plant rows.
- Gather tools & materials – Hose, fittings, connectors, staples, timer, pressure regulator, filter.
- Prepare the water source – Attach the faucet’s timer, filter, and regulator.
- Lay out the hose. Position it along plant bases; loop it around thirstier plants.
- Secure & connect – Attach the main line, and use staples to hold it in place.
- Test the system – Check for even water flow, leaks, and clogged pores.
- Cover & protect – Add mulch to reduce evaporation and shield the hose.
Step 1 – Plan Your Soaker Hose Layout
Before you do anything, take time to plan. Stand in your garden and picture how the hose will run through each area. Notice which spots dry out fastest and which stay damp longer. These differences will shape your watering zones.
Draw a simple map on paper. Mark beds, rows, trees, and obstacles. Group plants with similar water needs into the same zone. This prevents overwatering herbs while vegetables nearby dry out.
Walk each zone with a tape measure. Keep one soaker hose run under 50 feet for even watering. If you need more coverage, split it into multiple runs. Space hoses based on soil:
- Sandy: 12 inches apart
- Loam: 18 inches apart
- Clay: 24 inches apart
On your map, trace the exact hose path. Show where you’ll loop around thirsty plants and where regular hose will cross bare ground. This sketch becomes your installation blueprint.
Step 2: Gather Tools & Materials
Before you start installing, gather everything in one place. Having the right tools and materials nearby saves time and prevents mistakes mid-installation. Lay them out where you’ll be working so you can grab each item as you go.
You will need:
- Soaker hose (½” or ⅝” diameter)
- Standard garden hose for crossing non-plant areas
- Backflow preventer to keep dirty water out of your supply
- Pressure regulator, ideally 10–20 PSI for most soaker hoses
- Hose filter to reduce sediment and mineral buildup
- Hose connectors (T, Y, straight) and end caps
- Garden staples or stakes to hold the hose in place
- Sharp scissors or garden knife for clean cuts
- Mulch for covering the hose
Check each part before you start. A missing connector or faulty regulator can stop the installation cold.
Step 3: Prepare the Water Source
Start at your outdoor faucet. Shut off the water and clear any debris from the threads. Attach a backflow preventer first to protect your household supply.
Next, add a pressure regulator rated for soaker hoses—most work best at 10–20 PSI. Install it after any timer to prevent water hammer from damaging the regulator.
Add a hose filter to trap sediment and minerals before they enter the system. This reduces clogs and extends hose life.
If you’re running more than one zone, connect a metal Y-splitter with individual shut-off valves. This lets you isolate sections for repairs or run different zones on separate schedules.
Finish with a short leader hose from the splitter to your soaker hose. Keep connections tight but not overtightened to avoid damaging washers. This setup gives you stable pressure, clean water, and easy control from the source.
Step 4: Lay Out the Hose
With your water source set up, you’re ready to run the hose. Start by unrolling it in the sun for at least half an hour. This is the point where most DIY jobs go wrong, installing a hose that’s still stiff will leave kinks and uneven flow.
Begin at the leader hose connection from Step 3 and lay the soaker hose along the path you planned earlier. Keep it in direct contact with the soil so water seeps straight into the root zone. When you reach plants with higher water demand, loop the hose around their base before moving on.
Use these installer spacing rules:
- Seedlings: 1 inch from stem
- Mature plants: 2 inches from stem
- Sandy soil runs: 12 inches apart
- Loam runs: 18 inches apart
- Clay runs: 24 inches apart
Avoid tight turns as water slows at sharp bends. Where the path crosses bare ground or hardscape, switch to standard hose so you’re not wasting water in dead zones. Work methodically until every section is in place, ready for securing.
Step 5: Secure & Connect
Once every hose section is laid out, it’s time to lock the layout in place and connect it to the water source. Start by checking each run for twists or lifted sections as these will reduce seepage and create uneven watering. Press the hose flat against the soil before securing.
Use garden staples or landscape pins to anchor the hose every 2–3 feet, and at all curves. This prevents shifting during watering or when adding mulch later.
Make your connections in this order:
- Attach the soaker hose to the leader hose from Step 3.
- Use T-connectors for branching into two runs within a bed.
- Install Y-connectors with valves if you want to control flow between zones.
- Cap all open ends with end plugs to prevent leaks.
Tighten fittings by hand but over-tightening can damage washers. Once secured, your hose network is stable and ready for final adjustments.
Step 6: Test the System
With the hoses secured and connections tight, you’re ready to test. Turn the faucet on slowly—never blast full pressure at the start. Watch the hose as water moves through. A steady bead of moisture should form along the entire run within a few minutes.
Walk each zone and check for:
- Dry spots – reposition the hose or adjust spacing.
- Uneven flow – confirm pressure regulator is set between 10–20 PSI.
- Leaks at fittings – reseat connectors or replace worn washers.
- Over-saturation – shorten run time in that section.
Let the system run for 10–15 minutes, then dig a small hole near the hose in multiple spots. Moisture should penetrate 6–8 inches deep. Adjust your watering time until you hit that target. Your system is dialed in once the flow is even and the depth is consistent.
Step 7: Cover & Protect
Once your system is running evenly, protect it before daily use begins. Covering the hose shields it from sunlight, prevents shifting, and improves watering efficiency.
Spread mulch directly over the soaker hose, keeping it in full contact with the soil beneath. This layer reduces evaporation, regulates soil temperature, and extends hose life by blocking UV damage.
Material guidelines:
- Organic mulch (wood chips, straw, shredded bark) – improves soil as it breaks down.
- Inorganic mulch (stone, gravel) is longer-lasting but can retain heat in hot climates.
- Depth: 2–3 inches for most beds; 1–2 inches in heavy clay to prevent excess moisture retention
Keep mulch 1–2 inches away from plant stems to prevent rot. Once covered, the hose is protected and ready for consistent, efficient watering through the season.
Final Installation Review Checklist
Congratulations!!
You’ve completed your installation! Before you run the system for real, recheck these points to ensure nothing is missed.
- All hose runs sit flat against the soil without gaps.
- No kinks or sharp bends anywhere in the layout.
- Each connection is hand-tight with no visible leaks.
- The pressure regulator is set within the 10–20 PSI range.
- End caps are installed on every open hose end.
- Leader hose sections cross non-plant areas, not soaker hose.
- Flow reaches the last foot of each run within minutes.
- The mulch layer is even and not touching plant stems.
- Test dig shows soil moisture reaching 6–8 inches deep.
How Often Should You Run a Soaker Hose?
Soaker hoses work best on a consistent schedule that matches your soil’s drainage and your plants’ water needs. Your aim is to soak the root zone to 6–8 inches deep each time. Water in the early morning so moisture penetrates before heat causes evaporation.
| Soil Type | Duration per Session | Frequency (per Week) | Notes |
| Sandy | 45–60 min | 3–4 | Fast drainage; roots dry quickly. |
| Loam | 30–45 min | 2–3 | Balanced retention; most common schedule. |
| Clay | 20–30 min | 1–2 | Slow drainage; avoid pooling. |
Check soil 2–3 hours after watering. If moisture hasn’t reached target depth, extend time slightly. In heat waves, increase frequency, not run time, to avoid waterlogging. This keeps roots hydrated and healthy all season.
How to Maintain a Soaker Hose Irrigation for Long-Term Use?
A soaker hose can last many seasons if it’s maintained with care. Regular upkeep prevents clogs, damage, and uneven watering, ensuring your system delivers consistent performance year after year.
- Run clean water through each hose line to remove sediment before it compacts and restricts flow.
- Soak the hose in a diluted vinegar solution once per season to dissolve mineral buildup from hard water.
- Keep hoses covered under 2–3 inches of mulch or soil to prevent sun-related cracking and stiffening.
- Drain all water before freezing conditions, then store hoses in a dry, sheltered environment.
- Check hose placement after heavy weather; re-secure with staples where movement has occurred.
- Seal punctures or splits using a hose mender or rubber cement before further damage develops.
- Use a fine mesh filter at the water source to prevent debris from clogging pores.
- Reposition hoses each season to align with plant growth patterns and new garden configurations.
Troubleshooting common issues While installing a soaker hose irrigation system
Even well-installed soaker hose systems can run into issues. Below are the most common problems and the exact fixes professionals use to keep systems running efficiently.
1. Uneven Water Flow
A common sign is the first few feet of hose dripping heavily while the far end stays almost dry. This happens when pressure drops along the run. The fix is to either loop both ends back to the water source or break the run into shorter sections, each with its own feed, so pressure stays balanced.
2. Loss of Pressure in Long Runs
When a single run exceeds 50–100 feet, water delivery weakens toward the end. This is a result of friction loss inside the hose. The professional solution is to divide the layout into separate zones, each connected directly to the source, so every zone receives full pressure.
3. Hidden Flow Restrictors
Some hoses ship with small restrictor disks inside their fittings. These limit output, often without the installer realizing. Removing the disk can restore strong, even flow, but always keep a pressure regulator set to 10–20 PSI to avoid rupturing the hose.
4. Uphill or Sloped Runs
If you notice weak output or dry soil on elevated sections, the slope is stealing pressure. To correct it, start feeding the hose from the highest point or break the slope into independent runs so each section gets direct supply.
5. Clogged Hose Pores
Over time, sediment or mineral deposits can block seepage holes, causing uneven watering. Install an inline filter at the faucet and flush hoses monthly. This maintains consistent output and extends hose life.
6. UV Damage & Hose Brittleness
Hoses exposed to direct sunlight crack, harden, and develop oversized pores. A simple fix is to cover them with 2–3 inches of mulch. This protects against UV, stabilizes soil temperature, and improves efficiency.
Common Mistakes To Avoid While Installing A Soaker Hose Irrigation System
- When water pours out near the faucet but barely reaches the far end, the run is too long or losing pressure. Close the loop back to the source or split it into shorter sections for even coverage.
- A layout stretching over a hundred feet from one faucet will always struggle at the end. Break it into separate zones, each with its own feed, so every section gets equal flow.
- Mixing sprinklers and soaker hoses in the same line is a recipe for uneven watering. Separate them into their own zones so each one runs at the right pressure and schedule.
- When a hose climbs uphill, expect the top to run weak. Start the feed at the highest point or add a secondary feed halfway up the slope to balance the flow.
- Clogged pores usually trace back to debris in the line. A faucet filter and monthly flushing prevent buildup and keep the hose performing.
- Sections running through bare ground waste water. Replacing these with standard hose sends every drop to active planting zones.
In Closing
A well-installed soaker hose irrigation system delivers consistent moisture, saves water, and keeps plants healthier with less effort. Each step, from planning the layout to testing and covering the hoses, matters for efficiency and durability.
Proper setup prevents common problems like uneven watering or leaks, giving you reliable results all season. If you want a system that’s installed right the first time, trust Wise Water Works. With over 30 years in Houston irrigation, we’ll design and install a solution built to last.
Frequently Asked Questions
Question: Why is investing in a soaker hose irrigation system worth it?
A soaker hose system delivers water directly to the root zone, reducing evaporation and runoff. This targeted watering method lowers utility costs, promotes deeper root growth, and minimizes plant stress. Over time, it also decreases disease risk by keeping foliage dry.
Question: Can I connect a soaker hose to a rain barrel?
Yes, but water flow from a rain barrel is typically low-pressure. For consistent output, install a small inline pump or choose an elevated barrel with at least a 2–3 foot drop. Always add a filter to prevent sediment from clogging the hose.
Question: How long should a soaker hose last?
With correct seasonal maintenance, including draining before winter, storing out of direct sunlight, and avoiding sharp bends, a high-quality soaker hose can last 3–5 years without performance loss.